2013年10月26日土曜日

[WAAD]OAuth で WebAPI を保護する ③

前回、前々回に引き続き Windows Azure Active Directory(WAAD)の OAuth 2.0 で WebAPI を保護する方法を紹介します。

これまでのポスト
 [WAAD]OAuth で WebAPI を保護する ①
 [WAAD]OAuth で WebAPI を保護する ②


前回までで環境は整ったので、今回は実際にアクセスしてみます。(今回でようやく終わりです)

◆作業の流れ
これまでの作業の流れは以下の通りです。今回は最後の 7 を実行します。


  1. WebAPI の作成:今回は ASP.NET MVC4 の WebAPI を使います
  2. WebAPI の保護:WAAD を使って認可する様に設定を行います
  3. WebAPI を WAAD に登録:WAAD の保護対象リソースとして WAAD へ登録します
  4. OAuth クライアントの作成:本来は真面目にクライアントも作るのですが、今回は生の動きを見るために Chrome Extension の Advanced REST Client とダミー URL を使います
  5. OAuth クライアントを WAAD に登録:WAAD を使うアプリケーションとして OAuth クライアントを登録します
  6. WebAPI へのアクセス許可設定:OAuth クライアントが WebAPI へアクセスできるように設定します
  7. 動作確認:実際に OAuth2.0 のフローに従ってアクセスできるかどうかテストします。(今回は認可コードフローを試してみます)


◆実際の作業

7.動作確認

実際に OAuth クライアントから WebAPI へアクセスします。OAuth の認可コードフローを使って WAAD からアクセスに必要なアクセストークンを取得するので、まずは OAuth クライアントの client_id と client_secret を確認します。
クライアント ID(client_id)は 管理ポータルのアプリケーションの構成の中にありますが、client_secret は初期状態では生成されていません。そこでキーの項目で有効期限を選んで生成をします。尚、作成後ページ遷移をするとそのキーは二度と参照できなくなるので、必ずコピーしておきます。万一忘れてしまった場合は再度キーを生成します。


これで実際にアクセスするための準備はすべて終了です。
もう一度おさらいですが、今回やりたいことをシーケンスに表わすと以下のような流れになります。


上記のシーケンスの通り、まずは WAAD の 認可エンドポイントへリクエストを投げます。

※今回はクライアントを作らずにブラウザと Chrome Extension の Advanced REST Client を使うので、リソースオーナー(ユーザ)がクライアントへアクセスしてきたと仮定して、クライアントがリソースオーナーへリダイレクトしてくる認可要求を手動で実行します。

投げるリクエストは以下の通りです。

・メソッド:GET
・エンドポイント:
 https://login.windows.net/common/oauth2/authorize?api-version=1.0
・パラメータ
 response_type : code
 client_id : 先に取得した Client の client_id

実際はブラウザから以下の URL へアクセスします。
 https://login.windows.net/common/oauth2/authorize?api-version=1.0&response_type=code&client_id=[client_id]


すると、WAAD の認可エンドポイントから認証要求が返ってきますので、WAAD 上に登録した組織のアカウントでログインします。(フローの①)


認証が通ると、再度認可エンドポイントへ遷移し、設定がうまくいっていれば認可コードが払い出されます。
クライアントがダミー(WAAD に登録したアドレスが適当に http://localhost)なので、ブラウザにはエラーが表示されますが、アドレスバーを見るとちゃんとコードがパラメータに入っていることがわかります。
これが上記フローの②に該当します。


これで認可コードが取得できたので、次は WAAD のトークンエンドポイントで認可コードとアクセストークンを交換してもらいます。
今度は POST メソッドを使うので Advanced REST Client を使います。

投げるリクエストは以下の通りです。

・メソッド:POST
・エンドポイント:
 https://login.windows.net/common/oauth2/token
・フォームデータ
 grant_type : authorization_code
 client_id : 先に取得した Client の client_id
 client_secret : 先に取得した Client の client_secret
 code : 取得したcode
 resource : WebAPI の URI(WAAD に登録した URI)


こんな感じで投げます。


うまくいけば HTTP 200 が返ってきて、結果にアクセストークンが返ってきます。フローの④の部分です。(ついでに id_token も返ってきてます)


ようやくこれで WebAPI へアクセスする準備が整いました。
あとは単純に、このアクセストークンを Authorization ヘッダにセットして WebAPI の URI へリクエストを投げるだけです。

投げるリクエストは以下の通りです。実際のアクセストークンの前に「Bearer 」を入れるのを忘れないでください。

・メソッド:GET
・エンドポイント:
 http://localhost:52941/Api/Values
・ヘッダ
 Authorization : Bearer [取得したアクセストークン]

こんな感じです。上記フローの⑤に当たります。


前々回で保護設定をした状態では HTTP 401 が返ってきていましたが、今回はちゃんと HTTP 200 が返ってきます。
データも取得できているようです。


いかがでしょうか?
概念的に OAuth2.0 を使ってリソースを保護する、と言うだけなら簡単なのですが、実際にステップ毎に実行してみると理解ができると思います。
また、Visual Studio 2013 からは OWIN という新しい認証の実装が入ってきていますが、内部的にはこんな感じで動いています(たぶん)。

参考)Understanding OWIN Forms authentication in MVC 5


2013年10月25日金曜日

[WAAD]OAuth で WebAPI を保護する ②

前回に引き続き Windows Azure Active Directory(WAAD)の OAuth2.0 で WebAPI を保護する方法を紹介します。

◆作業の流れ
作業の流れは以下の通りで、前回は 1 ~ 2 を紹介しましたので、今回は 3 からです。

  1. WebAPI の作成:今回は ASP.NET MVC4 の WebAPI を使います
  2. WebAPI の保護:WAAD を使って認可する様に設定を行います
  3. WebAPI を WAAD に登録:WAAD の保護対象リソースとして WAAD へ登録します
  4. OAuth クライアントの作成:本来は真面目にクライアントも作るのですが、今回は生の動きを見るために Chrome Extension の Advanced REST Client とダミー URL を使います
  5. OAuth クライアントを WAAD に登録:WAAD を使うアプリケーションとして OAuth クライアントを登録します
  6. WebAPI へのアクセス許可設定:OAuth クライアントが WebAPI へアクセスできるように設定します
  7. 動作確認:実際に OAuth2.0 のフローに従ってアクセスできるかどうかテストします。(今回は認可コードフローを試してみます)


◆実際の作業

3.WAAD への保護リソースの登録

ここまでで WebAPI へアクセスした時に渡されるアクセストークンを WAAD で確認するための WebAPI 側の設定を行いました。次は WAAD 側に保護対象リソースとして WebAPI を登録する作業です。
以下の手順で WAAD にアプリケーションを追加します。

まずは Windows Azure の管理ポータルにログインし、Active Directory から対象にしたいディレクトリの設定を開きます。すると、アプリケーションというメニューがあるので、そこから追加をしていきます。

追加するのは「組織で開発中のアプリケーション」です。

次にアプリケーションに任意の名前を付けて、種類に「WEB アプリケーションや WEB API」にします。

次にアプリケーションの URI を指定します。ここには先ほどの WebAPI の URI を指定します。(今回は Visual Studio からデバッグするときの URL(http://localhost:xxxx)を使います。


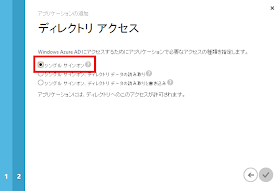
WAAD のディレクトリへのアクセス権限を設定します。
今回は特にディレクトリ上のデータへのアクセスは不要で、単に認証さえ出来ればよいので、「シングルサインオン」にチェックを入れておきます。


これで作成した WebAPI の WAAD への登録は完了です。


4.OAuth クライアントの登録~5.WebAPI を WAAD に登録

次は WebAPI にアクセスする OAuth クライアントです。

保護リソースへアクセスするための OAuth クライアント(実際はこれも Web アプリケーションやネイティブアプリケーション)についても WAAD が認識している必要があるので、WAAD 上へ登録します。
今回はアクセスの流れと WebAPI の保護を見るだけなので、実際にクライアント・アプリケーションを作らずに Chrome Extension の Advanced REST Client を使いますので、WAAD 上にはダミーの URL でアプリケーションを登録します。


先ほどの WebAPI の時と同じように登録を開始します。

URI には適当な値を入れておきます。今回は「http://localhost」としています。OAuth2.0 の認可エンドポイントから認可コードを取得するときにこの URI にフラグメントとしてコードがくっついてくるので、実際にアクセスできる URI である必要はなく、404 Not Found であろうとブラウザのアドレスバーからコードが取得できる、という寸法です。


ディレクトリアクセスについては特には必要ないので、「シングルサインオン」としておきます。


6.WebAPI へのアクセス許可設定

次は、先ほど作った WebAPI に対して OAuth クライアントがアクセスできるようにするアクセス許可設定を行います。
現状では Preview 機能ですが、アプリケーション構成の中に「クライアントアクセス」があるので、ここでクライアントとなれるアプリケーションを設定します。プルダウンに先ほど作った OAuth クライアントが出てくるので、そちらを選択して保存します。


さて、実はこれで設定は基本的には終わりです。

次回は実際にアクセスをして、動きを確認したいと思います。

2013年10月22日火曜日

[WAAD]OAuth で WebAPI を保護する ①

Windows Azure Active Directory(WAAD)が OAuth2.0 / OpenID Connect に対応しつつある、という話は以前紹介しましたが、具体的にどうやって使うのか?についてはあまり解説記事もないので、今回簡単に紹介していこうと思います。
(一部、Preview の機能を使うので今後手順などが変更になる可能性があります)

参考)[WAAD] OAuth2.0 への対応状況まとめ&ちょこっと OpenID Connect も
    http://idmlab.eidentity.jp/2013/07/waad-oauth20-openid-connect.html

◆やりたいこと
WebAPI へのアクセスを WAAD の OAuth2.0 の機能を使って保護する
⇒つまり、WAAD が発行したアクセストークンを使って WebAPI の実行の認可をしてみようと思います。

簡単に絵にすると以下のようになります。


ポイントは、ユーザが直接 WebAPI を実行するのではなく、OAuth クライアントが実行する、かつその際に OAuth クライアントに ID/PWD を設定しておかなくてもユーザの代理として機能する、というところです。


◆作業の流れ
作業の流れは以下の通りです。
  1. WebAPI の作成:今回は ASP.NET MVC4 の WebAPI を使います
  2. WebAPI の保護:WAAD を使って認可する様に設定を行います
  3. WebAPI を WAAD に登録:WAAD の保護対象リソースとして WAAD へ登録します
  4. OAuth クライアントの作成:本来は真面目にクライアントも作るのですが、今回は生の動きを見るために Chrome Extension の Advanced REST Client とダミー URL を使います
  5. OAuth クライアントを WAAD に登録:WAAD を使うアプリケーションとして OAuth クライアントを登録します
  6. WebAPI へのアクセス許可設定:OAuth クライアントが WebAPI へアクセスできるように設定します
  7. 動作確認:実際に OAuth2.0 のフローに従ってアクセスできるかどうかテストします。(今回は認可コードフローを試してみます)
ちょっと長めなので、2,3回に分割して紹介していきます。


◆実際の作業
では、始めます。

1.WebAPI の作成

Visual Studio 2012 で以下の通り WebAPI を作成します。ここで作成した WebAPI へのアクセスを Windows Azure Active Directory(WAAD)の OAuth を使って保護します。

まずは、ASP.NET MVC4 Web アプリケーションを作成します。


プロジェクトテンプレートでは WebAPI を選択します。


作成が終わったら F5 を押してデバッグモードで起動します。
ブラウザで http://localhost:[アサインされたポート番号]/Api/Values へアクセスすると Visual Studio のテンプレートに登録されている値が表示されます。


2.WebAPI の保護

作成した WebAPI を WAAD で保護するための設定を行います。具体的には Authorization ヘッダに設定されてくるアクセストークンの Validation をするために、global.asax にValidationHandler を作成、登録します。これでトークンの Validation に失敗すると HTTP 401 Unauthorized が返るようになります。

まず必要なライブラリへの参照を設定します。必要なのは、以下の3つです。
  • System.IdentityModel
  • JSON Web Token Handler for the Microsoft .NET Framework(NuGet パッケージ)
  • Microsoft Token Validation Extension for Microsoft .NET Framework 4.5(NuGet パッケージ)
System.IdentityModel

JSON Web Token Handler for the Microsoft .NET Framework

Microsoft Token Validation Extension for Microsoft .NET Framework 4.5


参照設定が終わったら、global.asax へ TokenValidationHandler を追加します。
この部分は MSDN の以下のサイトに紹介されているので、global.asax のソースコードはそのまま使います。
 Securing a Windows Store Application and REST Web Service Using Windows Azure AD (Preview)

環境によって変えるのは、以下の2点だけです。
 const string domainName = “xxx.onmicrosoft.com";
  ※契約した WAAD のテナントドメイン名
 const string audience = “http://localhost:[ポート番号]";
  ※作成した WebAPI の URI


一応ソースを張り付けておきます。

using System;
using System.Collections.Generic;
using System.IdentityModel.Metadata;
using System.IdentityModel.Selectors;
using System.IdentityModel.Tokens;
using System.Linq;
using System.Net;
using System.Net.Http;
using System.Security.Claims;
using System.Security.Cryptography.X509Certificates;
using System.ServiceModel.Security;
using System.Text;
using System.Threading;
using System.Threading.Tasks;
using System.Web;
using System.Web.Http;
using System.Web.Mvc;
using System.Web.Optimization;
using System.Web.Routing;
using System.Xml;
using System.Xml.Linq;

namespace ProtectedAPI
{
    // メモ: IIS6 または IIS7 のクラシック モードの詳細については、
    // http://go.microsoft.com/?LinkId=9394801 を参照してください

    public class WebApiApplication : System.Web.HttpApplication
    {
        protected void Application_Start()
        {
            AreaRegistration.RegisterAllAreas();

            WebApiConfig.Register(GlobalConfiguration.Configuration);
            FilterConfig.RegisterGlobalFilters(GlobalFilters.Filters);
            RouteConfig.RegisterRoutes(RouteTable.Routes);
            BundleConfig.RegisterBundles(BundleTable.Bundles);

            // Add Token Validation Handler -- 20131020
            GlobalConfiguration.Configuration.MessageHandlers.Add(new TokenValidationHandler());
        }
    }

    // Token Validation Handler Class -- 20131020
    internal class TokenValidationHandler : DelegatingHandler
    {
        // Domain name or Tenant name
        const string domainName = "xxxx.onmicrosoft.com";
        const string audience = "http://localhost:52941";

        static DateTime _stsMetadataRetrievalTime = DateTime.MinValue;
        static List<X509SecurityToken> _signingTokens = null;
        static string _issuer = string.Empty;


        // SendAsync is used to validate incoming requests contain a valid access token, and sets the current user identity 
        protected override Task<HttpResponseMessage> SendAsync(HttpRequestMessage request, CancellationToken cancellationToken)
        {
            string jwtToken;
            string issuer;
            List<X509SecurityToken> signingTokens;

            if (!TryRetrieveToken(request, out jwtToken))
            {
                return Task.FromResult<HttpResponseMessage>(new HttpResponseMessage(HttpStatusCode.Unauthorized));
            }

            try
            {
                // Get tenant information that's used to validate incoming jwt tokens
                GetTenantInformation(string.Format("https://login.windows.net/{0}/federationmetadata/2007-06/federationmetadata.xml", domainName), out issuer, out signingTokens);
            }
            catch (Exception)
            {
                return Task.FromResult<HttpResponseMessage>(new HttpResponseMessage(HttpStatusCode.InternalServerError));
            }

            JwtSecurityTokenHandler tokenHandler = new JwtSecurityTokenHandler()
            {
                CertificateValidator = X509CertificateValidator.None
            };

            TokenValidationParameters validationParameters = new TokenValidationParameters
            {
                AllowedAudience = audience,
                ValidIssuer = issuer,
                SigningTokens = signingTokens
            };

            try
            {

                // Validate token
                ClaimsPrincipal claimsPrincipal = tokenHandler.ValidateToken(jwtToken,
validationParameters);

                //set the ClaimsPrincipal on the current thread.
                Thread.CurrentPrincipal = claimsPrincipal;

                // set the ClaimsPrincipal on HttpContext.Current if the app is running in web hosted environment.
                if (HttpContext.Current != null)
                {
                    HttpContext.Current.User = claimsPrincipal;
                }

                // Verify that required permission is set in the scope claim
                if (ClaimsPrincipal.Current.FindFirst("http://schemas.microsoft.com/identity/claims/scope").Value != "user_impersonation")
                {
                    return Task.FromResult<HttpResponseMessage>(new HttpResponseMessage(HttpStatusCode.Unauthorized));
                }

                return base.SendAsync(request, cancellationToken);
            }
            catch (SecurityTokenValidationException)
            {
                return Task.FromResult<HttpResponseMessage>(new HttpResponseMessage(HttpStatusCode.Unauthorized));
            }
            catch (Exception)
            {
                return Task.FromResult<HttpResponseMessage>(new HttpResponseMessage(HttpStatusCode.InternalServerError));
            }
        }

        // Reads the token from the authorization header on the incoming request
        private static bool TryRetrieveToken(HttpRequestMessage request, out string token)
        {
            token = null;
            string authzHeader;

            if (!request.Headers.Contains("Authorization"))
            {
                return false;
            }

            authzHeader = request.Headers.GetValues("Authorization").First<string>();

            // Verify Authorization header contains 'Bearer' scheme
            token = authzHeader.StartsWith("Bearer ") ? authzHeader.Split(' ')[1] : null;

            if (null == token)
            {
                return false;
            }

            return true;
        }

        /// <summary>
        /// Parses the federation metadata document and gets issuer Name and Signing Certificates
        /// </summary>
        /// <param name="metadataAddress">URL of the Federation Metadata document</param>
        /// <param name="issuer">Issuer Name</param>
        /// <param name="signingTokens">Signing Certificates in the form of X509SecurityToken</param>
        static void GetTenantInformation(string metadataAddress, out string issuer, out List<X509SecurityToken> signingTokens)
        {
            signingTokens = new List<X509SecurityToken>();

            // The issuer and signingTokens are cached for 24 hours. They are updated if any of the conditions in the if condition is true.            
            if (DateTime.UtcNow.Subtract(_stsMetadataRetrievalTime).TotalHours > 24
                || string.IsNullOrEmpty(_issuer)
                || _signingTokens == null)
            {
                MetadataSerializer serializer = new MetadataSerializer()
                {
                    CertificateValidationMode = X509CertificateValidationMode.None
                };
                MetadataBase metadata = serializer.ReadMetadata(XmlReader.Create(metadataAddress));

                EntityDescriptor entityDescriptor = (EntityDescriptor)metadata;

                // get the issuer name
                if (!string.IsNullOrWhiteSpace(entityDescriptor.EntityId.Id))
                {
                    _issuer = entityDescriptor.EntityId.Id;
                }

                // get the signing certs
                _signingTokens = ReadSigningCertsFromMetadata(entityDescriptor);

                _stsMetadataRetrievalTime = DateTime.UtcNow;
            }

            issuer = _issuer;
            signingTokens = _signingTokens;
        }

        static List<X509SecurityToken> ReadSigningCertsFromMetadata(EntityDescriptor entityDescriptor)
        {
            List<X509SecurityToken> stsSigningTokens = new List<X509SecurityToken>();

            SecurityTokenServiceDescriptor stsd = entityDescriptor.RoleDescriptors.OfType<SecurityTokenServiceDescriptor>().First();

            if (stsd != null && stsd.Keys != null)
            {
                IEnumerable<X509RawDataKeyIdentifierClause> x509DataClauses = stsd.Keys.Where(key => key.KeyInfo != null && (key.Use == KeyType.Signing || key.Use == KeyType.Unspecified)).
Select(key => key.KeyInfo.OfType<X509RawDataKeyIdentifierClause>().First());

                stsSigningTokens.AddRange(x509DataClauses.Select(clause => new X509SecurityToken(new X509Certificate2(clause.GetX509RawData()))));
            }
            else
            {
                throw new InvalidOperationException("There is no RoleDescriptor of type SecurityTokenServiceType in the metadata");
            }

            return stsSigningTokens;
        }
    }
}


この状態で再度デバッグ実行し、ブラウザからアクセスするとAuthorizationヘッダがないため、401 Unauthorizedが返ってきます。


とりあえず、今回は WebAPI を作るところまでを紹介しましたので、次回は WAAD で実際に保護するための設定を入れていきます。

2013年10月19日土曜日

[IDaaS]PingIdentity Cloud Desktop で便利ライフ

Identity Federation 専業ベンダで有名な PingIdentity の Identity as a Service (IDaaS) である PingOne が 50ユーザ、各ユーザ 5 アプリケーションまでなら無料で使えます。(For Groups エディション)

 PingOne


このサービスは、Salesforce.com や Office365 から Facebook や twitter まで、さまざまなアプリケーションに対するシングルサインオンを一元管理できるサービスです。
利用者はこのサービス上に自分の使いたいアプリケーションを登録しておくことで、それぞれのアプリケーションへ個別にログインしなくても、PingOne へさえログインすればシングルサインオンできます。

メインは SAML IdP としての機能ですが、ブラウザに Extension を入れることでフォーム認証にも対応しています。(フォームへ ID / PWD を代行入力してくれます)

尚、各種パブリッククラウドの SaaS アプリケーションへの対応はもちろん、自社内のアプリケーションについても SAML や Extension を使って設定を行うことでシングルサインオン対象とすることができます。


細かい設定の方法は後日紹介しようと思いますが、今回は軽く使ってみた操作イメージを紹介します。

まずはブラウザで Cloud Desltop を起動します。要は登録したアプリケーションを起動するためのランチャーです。

とりあえず For Groups エディションで登録できるアプリケーションは 5 つまでなので、LinkedIn / Evernote / Twitter / facebook / salesforce.com を登録しています。

salesforce.com は SAML SSO、他のアプリケーションはブラウザ Extension を使った Basic SSO アプリとして登録しています。


まず、Basic SSO 対応の LinkedIn を起動してみます。
ブラウザに Extension をインストールした状態で LinkedIn へ遷移すると、Extension が起動し、初回のみユーザ ID とパスワードの入力をフックします。


これで一旦 LinkedIn へログインすると次回以降は Cloud Desktop から LinkedIn を起動するとログイン画面でユーザ ID / パスワードと自動的に入力してくれます。


次は salesforce.com です。
こちらは SAML を使ってシングルサインオンするので、salesforce.com 側にも設定をする必要があります。細かい設定方法などは後日紹介しますが、基本的な設定のノリは以下で書いた記事と同じです。

クラウド・サービスと社内システムとのID連携 最新トレンド
 Salesforce CRM/Force.comとのアイデンティティ基盤連携を実現する

PingOne でアプリケーションを追加するとあらかじめ salesforce.com に追加すべき情報が一覧で表示されるので、手順に従って設定を行います。


手順に従い、salesforce.com と PingOne の両方を設定します。

まずは salesforce.com 側から。


続いて salesforce.com の Metadata を PingOne へ登録します。


登録が終わったら先ほどの LinkedIn と同じく Cloud Desktop から起動すると、SAML 認証連携が走ってログインできます。


ちなみに、iPad などでこれを使うともの凄く便利です。
タブレットやスマホで毎回細かいフィールドにパスワードを入力する手間から解放されるだけでもかなりの生産性アップになりますので、例えば外回り営業などのシーンで活用することができるかもしれませんし、もちろん個人ユースで facebook や twitter を使う上でもかなり便利です。

アプリケーションもたくさん対応しているようなので、後日もう少し細かく紹介しようと思います。

2013年10月18日金曜日

[MIIS/ILM/FIM]ついに MIIS2003 の延長サポートも終了

今でこそ Forefront ブランドになっている Identity Manager ですが、1999 年の Microsoft の Zoomit 買収から色々と名前を変えながら彷徨ってきています。

◆買収前史
1997年 Microsoft による LinkAge 買収。LinkAge Directory Exchange(LDE) を取り込む
1999年 Microsoft による Zoomit 買収。VIA を Microsoft Metadirectory Services(MMS)と改名

◆Microsoft Identity Integration Server(MIIS)時代
2003年 Microsoft Identity Integration Server(MIIS) 2003 発表
2005年 Microsoft による IdNexus 買収。Alacris を Certificate Lifecycle Manager(CLM)へ

◆Identity Lifecycle Manager(ILM)時代
2007年 Identity Lifecycle Manager 2007(MIIS2003SP2+CLM)発表

◆Forefront Identity Manager(FIM)時代
2010年 Forefront Identity Manager 2010(FIM2010)発表
2011年 Microsoft による BHOLD 買収。BHOLD Suite へ
2012年 Forefront Identity Manager 2010 R2発表


と、色々と変遷しているのですが、日本で初めて発売されたのが 2003年の MIIS2003 Enterprise Edition でした。
その MIIS2003 EE の延長サポートがついに 2013/10/8 で終了しました。Windows XP ももう少しで本当に終わりですが MIIS も終わりです(合掌)


公式リンク

[FIM2010]Hotfix(ビルド 4.1.3479.0)がリリース

先日の 4.1.3469.0 に引き続き 4.1.3479.0 がリリースされました。

KB ページ


1週間しか間があかずに新しい Hotfix がリリースされる、というのはこれまでなかったような気がします。。。


さて、今回の修正は以下の通りです。

FIM Service

Issue 1
When you have very long XPath queries in the FIM Service, CPU usage may increase. This causes a decrease in performance.

FIM Synchronization Service

Issue 1
The Synchronization Service may leak memory when you use an ECMA2 connector.

Issue 2
When an existing ECMA2 connector is updated when a server configuration is moved between servers, the update is unsuccessful. This problem occurs when the connector requires access to encrypted parameters, such as a password, to complete the operation.

Issue 3
When an import is confirmed, a staging error may occur in rare cases. When this problem occurs, you receive the following error message:

Cannot insert duplicate key row in object 'dbo.mms_cs_link'

Issue 4
If during a full import on the Active Directory management agent there is a reference on an organizational unit (OU) to an OU two levels down, the sync engine will crash.

Issue 5
When you select the option to abandon the key set in the Synchronization Service Key Management Utility, the operation may be unsuccessful. Additionally, you receive the following error message:

Value is not in the expected range.

BHOLD suite

Issue 1
The processing of BHOLD Queue entries takes a longer time than expected to finish after an earlier hotfix is applied.

Issue 2
You cannot add a permission for a user by using the BHOLD connector if the permission was ever denied for the user.

Issue 3
The removal of permissions from a personal role (prefixed with PR-) does not trigger the removal of those permissions from the user.

ちなみに FIM Reporting を System Center Service Manager 2012 SP1 以降の環境で使っている場合は、この Hotfix を適用する前に一旦 FIM Reporting の機能を削除してから Hotfix をインストールし、再度 FIM Reporting を追加するという手順を踏む必要があるようです。


2013年10月15日火曜日

[IDaaS]Salesforce Identityがリリース

2012年秋の Dreamforce で発表された Salesforce Identity ですが、ようやく正式にリリースされたようです。(対象は Enterprise Edition / Performance Edition / Unlimited Edition とのこと)


※画面ショットは公式サイトより

発表時の blog はこちら
 原文
  http://blogs.developerforce.com/engineering/2012/09/introducing-salesforce-identity.html
 日本語
  http://blogjp.sforce.com/2012/09/salesforce-iden-ce09.html

 参考)日本の公式ページ
  http://www.salesforce.com/jp/platform/identity/


まだ現物を触れていないので何とも言えませんが、各種オンライン記事を見ると Active Directory 統合やら多要素認証や Google や SAP など各種アプリケーションへのシングルサインオン基盤(ランチャー)のような機能や SCIM を使ったプロビジョニング機能などがあるようです。


  • A cloud directory with user profiles, workflows and administration.
  • Directory integration and support for Active Directory.
  • Dashboards and reporting.
  • Multi-factor authentication.
  • Single sign-on, integration with Salesforce Chatter and social feeds, mobile identity and social sign-ons via Facebook, Google, Amazon and Paypal.
  • Policies based on device such as mobile or PC.

※出展:zdnet / http://www.zdnet.com/salesforce-launches-identity-service-eyes-okta-7000021928/


  • Cloud Directory: Scalable directory services, including fully automatable user profile management, workflows and delegated administration to improve compliance
  • Directory Integration: New Salesforce Identity Connect enables out-the-box support for existing directory investments such as Active Directory
  • Reporting and Dashboards: Builds and customizes reports and dashboards instantly using drag and drop tools to better understand usage and access patterns across apps
  • Multi-factor Authentication: Adds an extra layer of security when logging in or accessing critical resources

※出展:forbes / http://www.forbes.com/sites/benkepes/2013/10/15/salesforce-launches-identity-tying-together-the-complexity-of-the-distributed-enterprise/


中にはこんな記事も。

Salesforce Identity rocks the boat for startups like Okta and Ping
 http://www.citeworld.com/cloud/22557/salesforce-identity-versus-okta-ping-onelogin

確かにこれまで Okta とか PingIdentity などのサードパーティに頼っていたフェデレーション関係の機能が本体に取り込まれるとなると波風も立つかと。。。

しかし現状の Windows Azure Active Directory の例を見ていても他のサービスとの統合は確かに出来るようにはなるんでしょうが、「器用な」連携はまだまだ、、という気がするので、サードパーティはそのあたりの「かゆいところに手が届く」サービスや製品をリリースすることでエコシステムが機能していくことになるんだと思います。
(Ping Federate と Office365 の連携なんかはよい例で、AD FS を使わずに PingIdentity の製品を使うことでクレームルールだけではできない「器用な」ことができるようになっています)


尚、現状私の手元にある Salesforce のライセンスが Developer Edition と Professional Edition だけなので、何とか対象になっているエディションを入手できたら実際に試してみます。

ちなみに Developer Edition でも ID プロバイダ、認証プロバイダ、シングルサインオン設定などは可能で、いつの間にか認証プロバイダの種類に OpenID Connect が登場しているあたりが流石の Pat Patterson / Chuck Mortimore コンビというあたりです。


2013年10月10日木曜日

[FIM2010]Hotfix(ビルド 4.1.3469.0)が出ています

久しぶりに新しい Hotfix が出ています。

Forefront Identity Manager 2010 R2 向け Hotfix build 4.1.3469.0
 http://support.microsoft.com/default.aspx?id=2877254


ECMA2.0 関係の修正や Windows Azure Active Directory コネクタ関係の修正も含まれているので、是非適用しておきたいところです。


尚、これは今回に限った話ではありませんが、Hotfix を適用すると各種 dll のビルド番号が更新され、本体の exe からうまく認識されなくなることがあります。
そんな時は、MIIServer.exe.config などの .config ファイルの中の セクションの bindingRedirect 要素に古い dll のビルド番号と新しい dll のビルド番号を書いておくことで回避をすることができます。
※FIM Synchronization の場合。FIM Service の場合は同じく対応する Microsoft.ResourceManagement.Service.exe.config ファイルを記載する必要があります。